
Healthcare
What a Physiotherapy Assistant Does, and How They Fit Into Your Rehab
A physiotherapy assistant delivers the exercise program a physiotherapist writes, supervises technique and reports progress. Here is how the two roles divide.


Starting rehabilitation can feel uncertain, especially after surgery, an injury or a long stretch of pain. Most people know what a physiotherapist does, and far fewer know what a physiotherapy assistant adds to a treatment plan. That gap causes a lot of quiet worry about who is actually handling the recovery.
The short answer: an assistant works under the direction of a registered physiotherapist, carries out the parts of your program that need supervision and repetition, and reports back. Here is what that means in practice.
What a Physiotherapy Assistant Does
A physiotherapy assistant supports a registered physiotherapist in delivering supervised rehabilitation. The physiotherapist designs and oversees the plan; the assistant helps you carry it out consistently and correctly.
Typical responsibilities include:
- Guiding you through prescribed exercises
- Assisting with mobility and strengthening drills
- Setting up rehabilitation equipment
- Monitoring technique and safety during sessions
- Reporting your progress back to the supervising physiotherapist
What an assistant does not do is equally important. They do not diagnose conditions, design treatment plans on their own, or change your program. Those tasks stay with the physiotherapist.
Why Patients Are Referred to an Assistant
Assistants are typically involved when a patient needs regular, guided exercise sessions rather than frequent one-on-one physiotherapy appointments. This is common in:
- Post-surgical rehabilitation
- Sports injury recovery
- Workplace injury programs
- NDIS and disability support services
- Chronic pain management plans
- Senior mobility and balance training
The logic is simple: repetition and correct technique are what make rehabilitation work, and supervised sessions improve both. Having someone check your form reduces the risk of doing an exercise wrong and setting your recovery back.
The Difference Between a Physiotherapist and an Assistant
Understanding who does what sets realistic expectations.
Physiotherapist:
- Assesses injuries and diagnoses conditions
- Designs your treatment plan
- Performs manual therapy and advanced techniques
- Adjusts the plan as you progress
Physiotherapy assistant:
- Implements the prescribed exercise program
- Supervises and supports the day-to-day rehab work
- Tracks measurable progress
- Keeps you motivated and on schedule
The two roles work together: the physiotherapist leads the clinical direction, and the assistant maintains the consistency that recovery depends on.
What to Expect Before Your First Session
Before assistant-led sessions begin, a registered physiotherapist conducts an assessment. The injury, any movement limits and your goals are all discussed, and the plan is set from there.
You should leave that assessment with:
- A clear explanation of the treatment plan
- Measurable recovery goals
- A realistic timeline
- An understanding of how sessions will run
Speak up about pain levels and concerns as you go. The program is adjusted around your feedback, not delivered at you.
Qualifications and Scope of Practice
In Australia, physiotherapy assistants typically hold a Certificate III or IV in Allied Health Assistance, and they work under the supervision of a registered physiotherapist. Assistants are not registered health practitioners themselves, and they do not provide independent treatment.
That supervision model is what makes the role safe: the person with the clinical training owns the plan, and the assistant delivers the parts of it that are well defined and repeatable.
Benefits of Working With a Physiotherapy Assistant
Consistent supervision
Regular oversight improves exercise accuracy and reduces the risk of re-injury.
Structured progression
Programs can be adjusted gradually, based on your feedback and clinical review.
Motivation and accountability
Sticking to a rehabilitation plan is easier with someone expecting you and encouraging you.
Cost-effective care
Assistant-led sessions often cost less than full physiotherapy appointments while keeping clinical oversight in place.
Increased confidence
Many people feel safer doing their exercises with guidance than attempting them alone at home.
Common Conditions Supported by Assistants
Assistant-guided rehabilitation is commonly used for:
- Knee and hip replacements
- Shoulder injuries
- Back and neck pain
- Sports-related muscle strains
- Post-fracture rehabilitation
- Neurological conditions requiring mobility training
In all of these, repetition and technique matter, and that is exactly what supervised sessions deliver.
Preparing for Your First Session
- Wear comfortable, flexible clothing
- Bring medical reports or imaging results
- Bring a list of your medications
- Note your pain triggers and movement limitations
Rest and hydration also help, because sessions can be physical work.
How Progress Is Monitored
Progress is measured through range of motion testing, strength assessments, functional movement checks and pain tracking. The assistant documents each session and reports to the supervising physiotherapist, and if progress plateaus or symptoms change, the plan is reviewed and adjusted.
Is It Suitable for Everyone?
Most patients can benefit from assistant-guided rehabilitation, but some situations need closer involvement from the physiotherapist. People with severe neurological conditions, acute trauma or unstable medical issues may need more direct clinical supervision, and assistant involvement is structured accordingly. The initial assessment determines what is appropriate.
Questions to Ask Before Starting
Before committing to a program, ask:
- How often will sessions occur?
- Who supervises the assistant, and how?
- How will progress be reviewed?
- What happens if my pain increases?
- Are there home exercises between sessions?
Clear answers help avoid confusion later, and any provider should be comfortable giving them.
Choosing a Provider
When you compare physiotherapy providers, look at qualifications, experience with your type of injury, pricing transparency, communication style and the facilities available. Reading independent reviews and checking credentials takes a few minutes and saves a lot of second-guessing.
Who Does What in Your Rehab
A physiotherapy assistant provides structured, supervised support that makes rehabilitation consistent, and consistency is what makes recovery work. The assistant delivers and monitors the program; the physiotherapist owns the clinical decisions; and you get more guided repetition than one-on-one appointments alone could provide. Understanding the division of roles is enough to start therapy informed and confident.
FAQs
Is a physiotherapy assistant qualified to treat injuries independently?
No. An assistant works under the supervision of a registered physiotherapist and follows a prescribed treatment plan.
Are sessions with an assistant cheaper than seeing a physiotherapist?
Generally, assistant-led sessions cost less while still maintaining clinical oversight.
Can an assistant help after surgery?
Yes. Post-operative rehabilitation often includes supervised exercise guided by an assistant.
How long does rehabilitation usually take?
Recovery time varies with the injury, your age, overall health and how consistently you do the exercises.
Do I still see the physiotherapist during my program?
Yes. The physiotherapist reviews your progress regularly and adjusts the plan when needed.
Sources: Australian Physiotherapy Association; Allied Health Professions Australia, guidance on assistant roles.








Healthcare
SIL Provider Costs: Simple Breakdown for Families
SIL costs come down to support hours, the home and overnight staffing. Here is what NDIS funding covers, what falls outside it and how to compare providers.


Understanding what Supported Independent Living costs, and why, is one of the harder parts of choosing a provider. The figures on a quote can look arbitrary until you know what drives them, and families often compare packages without knowing what is inside each one.
This guide breaks down what SIL covers, how the pricing is calculated, and what to ask a provider for in writing before you decide.
What SIL Actually Covers
Supported Independent Living funds the day-to-day support that helps a person live safely in a shared or individual home. It generally includes:
- Everyday assistance with meals, cleaning and personal care
- Overnight support, either active or sleepover
- Help with routines, appointments and social activities
- Coordination with therapists and other services
- Skills development that builds independence
SIL is funded through the NDIS, and the pricing arrangements set limits on what providers can charge for each support they deliver. That is the protection to lean on when comparing quotes.
The Four Factors That Drive SIL Costs
Every SIL quote comes back to four things.
1. The Level of Support Required
The biggest factor is how much assistance the person needs across the day and night. A higher support ratio, such as one worker to one participant, costs more than one worker supporting two or three people, because more staffing hours are involved.
2. The Home and Living Arrangement
Costs shift with the property and the setup: whether the home is fully accessible, newly built or adapted, and whether it is shared. Shared homes often cost less per person because support worker hours are spread across residents.
3. Day Versus Night Support
Overnight support comes in two forms. Active support means staff are awake and working through the night; sleepover support means a worker sleeps on site and responds if needed. Active overnight support costs more, and the difference matters when you read a quote.
4. Supports Outside SIL
Therapy, community access, transport and capacity-building supports are funded separately from SIL. They are not part of the core cost, and a clear quote will not blur the line between them.
How SIL Pricing Is Calculated
SIL is not priced as a single rate. It is built up from the support a person needs, and the process works like this.
The provider prepares a roster of care: a document setting out the support to be delivered across a typical week, including the staffing ratio, the number of support hours and the type of overnight support. Each part of that roster lines up with a support item in the NDIS pricing arrangements, and each item has a price limit. The roster is submitted to the NDIA, which reviews it and approves funding that matches it.
The practical effect is that the total comes from the hours, the ratio and the support types rather than from a provider’s price list. Providers cannot charge above the price limits for the support items involved, so two quotes built on the same roster should be comparable. If one quote is much higher, ask what is in its roster that the other one leaves out.
What to Ask for in Writing
Before committing to a provider, ask for four things in writing:
- An itemised quote against the current price limits, showing each support item and its rate
- The staffing ratio proposed for day support and for overnight support, with the roster of care attached
- The type of overnight support, and whether it is active or sleepover
- What happens when the roster changes, such as during holidays, illness or a change in needs, and how those changes are priced
A provider who finds these questions difficult is telling you something. The good ones answer them as a matter of course.
What Is Not Included
Some everyday costs sit outside SIL funding entirely: rent or mortgage payments, food and groceries, utilities, personal items, and transport that is not funded through an NDIS transport budget. Ask how the house handles these costs, because the arrangement varies between properties.
Choosing a Provider
When you compare providers, check for:
- Transparent pricing, with quotes that line up against the price limits
- A roster of care that matches the person’s real support needs
- A comfortable, well-maintained home
- Support workers who treat residents with respect
- Opportunities for skill building and independence
- Clear communication with families and support coordinators
The Roster Matters as Much as the Rate
SIL pricing makes sense once you know it is built from hours, ratios and support types rather than from a headline rate. Ask for the itemised quote, the roster and the overnight support type in writing, check the figures against the price limits, and compare providers on exactly the same basis. That is how families avoid surprises, and it is a fair request of any provider.
Sources: NDIS Pricing Arrangements and Price Limits, and SIL price limits, National Disability Insurance Agency.
Healthcare
Accessible Features Every Medium Term Accommodation Should Have
Step-free entry, a roll-in shower, reachable storage and grab rails are the basics in accessible medium term accommodation. Here is what else to check.
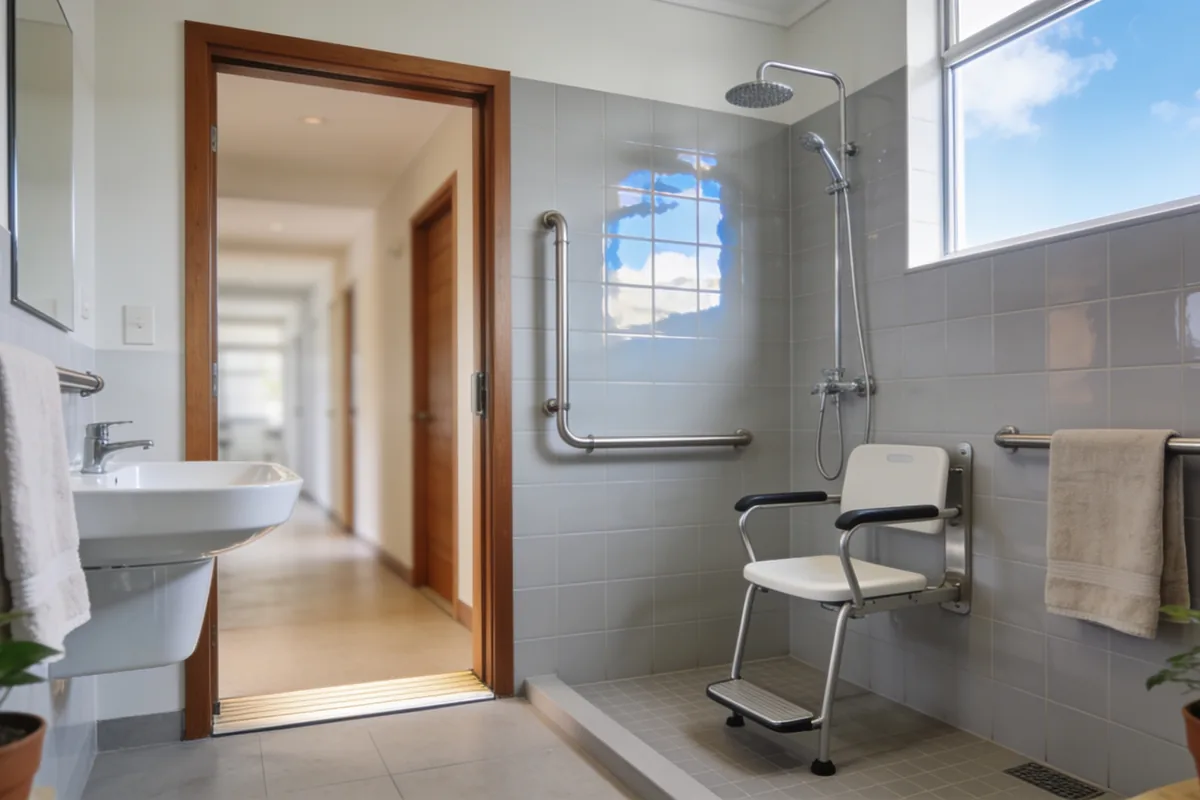
Choosing medium term accommodation is usually a decision made under pressure. A hospital discharge, a change in circumstances or a wait for a permanent home all come with a deadline attached, and it is easy to focus on the rent and the location and walk past the details that decide whether the place actually works for the person living in it.
This is the list to take to the inspection. It sets out the features that matter, and the dimensions behind them, so you can check what a property genuinely offers rather than what the listing implies.
1. Wheelchair-Accessible Entrances and Pathways
An accessible home starts at the front door. Look for an entrance without steps, ramps where there is a change in level, and smooth, non-slip paths inside and out.
- Doorways need a clear opening of at least 820mm under the NCC’s liveable housing provisions (Livable Housing Design Standard, clauses 2.1 and 3.1), and 850mm where a wheelchair is in daily use, which is the Gold level of the Liveable Housing Design Guidelines and the minimum AS 1428.1 sets for a continuous accessible path of travel (clause 13.2).
- Ramps need gentle slopes and handrails.
- Automatic doors or lever-style handles are easier to use than round knobs.
2. Accessible Bathrooms and Toilets
The bathroom is where accessibility is won or lost. Features to check for:
- Roll-in showers with grab bars
- Height-adjustable shower heads
- Non-slip flooring
- Raised or adjustable toilets
- Enough clear space to turn a wheelchair
These are the details that allow a resident to manage their own hygiene safely.
3. Kitchen Accessibility
A kitchen a resident can use independently changes the whole feel of a stay. Key features include:
- Lowered benchtops and sinks for wheelchair access
- Clear space under the sink and cooktop for seated use
- Lever taps and easy-to-reach storage
- Pull-out shelves and drawers
4. Bedroom Accessibility
The bedroom needs room to move and a layout that works with mobility aids:
- Enough space around the bed for a wheelchair or frame
- An adjustable bed where it is needed
- Wardrobes and drawers at reachable heights
- An emergency call system within reach of the bed
5. Smart and Assistive Technology
Technology is doing more of the accessibility work in newer and renovated properties:
- Automated lighting and climate control
- Voice-activated or touch controls for doors, windows and appliances
- Visual and auditory alarms for emergencies
- Smart home features that can help monitor wellbeing
6. Safe and Supportive Outdoor Areas
Outdoor space is part of the accommodation, not a bonus. It gives residents somewhere to be outside safely:
- Smooth, non-slip surfaces
- Ramps and handrails where needed
- Garden beds at accessible heights
- Seating and shade
7. Emergency and Safety Features
Safety features protect residents and reassure the people supporting them:
- Call buttons or cords in bedrooms, bathrooms and common areas
- Accessible fire exits and a clear evacuation plan
- Non-slip floors and handrails throughout
- Well-lit hallways and staircases
8. Proximity to Support Services
Location is an accessibility feature too. Look for a property that is:
- Close to health services, shops and transport
- Easy for support workers and therapists to reach
- Served by safe walking and wheelchair routes
A home that is well designed but far from the services a resident needs every week is only half the job.
Checking the Details at an Inspection
The dimensions and features above come from the accessible housing provisions in the National Construction Code and the Liveable Housing Design guidelines. Not every property will meet all of them, and older homes will meet fewer without renovation, so it is worth asking which standard a property has been built or updated to.
Take this list to the inspection and work through it room by room. Measure the doorways where you can, look at how the bathroom drains, and picture the resident using the kitchen at their height. Ten minutes with the checklist tells you more than any brochure.
Prioritising the Entrance, Bathroom and Kitchen
Accessibility is not a single feature but a combination, and the details decide whether medium term accommodation works as a home or merely shelters someone between moves. Prioritise the entrance, the bathroom and the kitchen, check the emergency features, and ask directly which guidelines the property follows. The right property is the one that needs the fewest compromises.
Sources: National Construction Code 2022 Volume Two Part H8 and the ABCB Livable Housing Design Standard 2022 (clauses 2.1, 3.1, 3.3); AS 1428.1 clause 13.2; Liveable Housing Design Guidelines (Gold level).
Healthcare
What to Expect at Your First Appointment With an Exercise Physiologist
A first session with an exercise physiologist runs 45 to 60 minutes and covers your history, goals and a set of baseline tests before any program starts.

Starting with an exercise physiologist can feel like a big step, whether you have been referred by your GP, you are recovering from surgery or injury, or you are managing a long-term condition. The nerves are normal, and they usually disappear within the first ten minutes of the appointment.
Here is what actually happens at that first session, so you know what you are walking into.
What an Exercise Physiologist Does
An exercise physiologist is a university-qualified allied health professional who prescribes exercise as treatment. That includes programs for:
- Chronic conditions such as diabetes, arthritis, heart disease and asthma
- Rehabilitation after injury or surgery
- Pain management
- Improving how you move day to day
- Building strength and mobility
Unlike a personal trainer, an exercise physiologist uses clinical assessment and reasoning to design a program around your health, not just your fitness goals.
What Happens at Your First Appointment
An initial session usually runs 45 to 60 minutes and has five parts.
1. Discussion and health history
The appointment starts with a conversation about your medical conditions, medications, past injuries or surgeries, pain levels, daily habits and current activity. This is what makes the plan safe and realistic, so it is worth answering fully rather than briefly.
2. Goal setting
Next you set goals together, and they can be practical rather than clinical: reducing pain, building strength or flexibility, returning to sport, improving balance, or managing the symptoms of a long-term condition. The goals become the spine of the plan.
3. Physical assessment
You may go through some baseline testing, which can include posture, range of motion, strength and endurance, gait (walking) analysis, balance tests and cardiovascular measures. These results give the physiologist something to measure progress against.
4. A first taste of the program
Depending on your condition and how you are feeling, you may try some low-impact exercises in the first session: stretches, light strength work, balance practice, gentle aerobic exercise or mobility drills. Your technique is the focus, so the exercises are safe and the results follow.
5. Education and next steps
You should leave understanding why each exercise is there. That includes guidance on progressing safely, what to do at home, how to manage pain and what to work on between sessions, along with your plan and appointment schedule.
What to Bring
- Comfortable clothing and supportive footwear
- Any medical reports, referrals or scans
- A list of your medications
- A water bottle
- Details of any funding you are using, such as NDIS, a GP chronic condition management plan, WorkCover or private health cover
FAQs
Do I need a referral?
It depends on how you are paying. For a Medicare rebate under a GP chronic condition management plan, you need a referral from your GP. That plan has its own rules, including how many allied health sessions it covers, and the guide to GP chronic condition management plans sets them out. WorkCover and DVA claims also require a referral or approval from the scheme. Private clients can generally book directly, though some private health funds ask for a referral before paying benefits, so check your fund. NDIS participants can use plan funding to engage a provider whose services are in their plan.
How many sessions will I need?
It depends on your condition, goals and progress. Your physiologist will discuss it at the first appointment and review it as you go.
Is it safe if I have a chronic condition or ongoing pain?
Yes, that is the specialty. Exercise physiologists are trained to work with chronic conditions and pain, and programs are tailored to what is safe for you.
Bring Your Questions
A first appointment is the start of a plan built around your body and your goals, not a generic workout. Bring your questions, wear something you can move in, and give the program a few weeks before you judge it. Most people find the hardest part was making the booking.
Sources: Exercise and Sports Science Australia, register of accredited exercise physiologists.


 Home & Garden1 year ago
Polycarbonate Roofing: What It Is Good For, and What It Is Not
- Travel1 year ago
Getting Involved in Alice Springs: Clubs, Events and Community Groups
- Healthcare1 year ago
Plantar Warts: The Treatment Ladder, From Patience to Surgery
- Healthcare1 year ago
GP Chronic Condition Management Plans: How Medicare Funds Ongoing Care (the plan formerly called EPC)
- Healthcare1 year ago
Heel Pain: Five Causes, One Order of Treatment
- Healthcare1 year ago
The Role of Speech Therapy in Treating Common Speech & Language Disorders
- Healthcare1 year ago
Laser Treatment for Nail Fungus: What It Involves and What the Evidence Says
- Travel12 months ago
The Ultimate Family Guide to Uluru: Fun Things to Do, Where to Stay & What to Pack